前言
在安装Hive3.1.2之前,请首先安装Hadoop3.1.3。
hadoop3的搭建可以参考本站这一篇文章 https://www.linbaixiang.com/hadoop3/
一、安装Hive3.1.2
1. 下载并解压Hive安装包
首先需要下载Hive安装包文件, Hive官网下载地址
http://archive.apache.org/dist/hive/hive-3.1.3/
遇到网速问题可以找国内镜像,如阿里云的镜像:
https://mirrors.aliyun.com/apache/hive/
下载的安装包为 apache-hive-3.1.2-bin.tar.gz
sudo tar -zxvf ./apache-hive-3.1.2-bin.tar.gz -C /usr/local   # 解压到/usr/local中
cd /usr/local/
sudo mv apache-hive-3.1.2-bin hive       # 将文件夹名改为hive
sudo chown -R dblab:dblab hive            # 修改文件权限
注意,上面的dblab:dblab是用户组和用户名,如果你当前使用用户名hadoop登录了Linux系统,则把dblab替换成hadoop。
2. 配置环境变量
为了方便使用,我们把hive命令加入到环境变量中去,
请使用vim编辑器打开.bashrc文件,命令如下:
vim ~/.bashrc在该文件最前面一行添加如下内容:
export HIVE_HOME=/usr/local/hive
export PATH=$PATH:$HIVE_HOME/bin
export HADOOP_HOME=/usr/local/hadoop
HADOOP_HOME需要被配置成你机器上Hadoop的安装路径,比如这里是安装在/usr/local./hadoop目录。
保存退出后,运行如下命令使配置立即生效:
source ~/.bashrc3. 修改/usr/local/hive/conf下的hive-site.xml
执行如下命令:
cd /usr/local/hive/conf
mv hive-default.xml.template hive-default.xml
上面命令是将hive-default.xml.template重命名为hive-default.xml;
然后,使用vim编辑器新建一个配置文件hive-site.xml,命令如下:
cd /usr/local/hive/conf
vim hive-site.xml
在hive-site.xml中添加如下配置信息:
<?xml version="1.0" encoding="UTF-8" standalone="no"?>
<?xml-stylesheet type="text/xsl" href="configuration.xsl"?>
<configuration>
  <property>
    <name>javax.jdo.option.ConnectionURL</name>
    <value>jdbc:mysql://localhost:3306/hive?createDatabaseIfNotExist=true</value>
    <description>JDBC connect string for a JDBC metastore</description>
  </property>
  <property>
    <name>javax.jdo.option.ConnectionDriverName</name>
    <value>com.mysql.jdbc.Driver</value>
    <description>Driver class name for a JDBC metastore</description>
  </property>
  <property>
    <name>javax.jdo.option.ConnectionUserName</name>
    <value>hive</value>
    <description>username to use against metastore database</description>
  </property>
  <property>
    <name>javax.jdo.option.ConnectionPassword</name>
    <value>hive</value>
    <description>password to use against metastore database</description>
  </property>
</configuration>
然后,按键盘上的“ESC”键退出vim编辑状态,再输入:wq,保存并退出vim编辑器。
把 hive-env.sh.template 重命名为 hive-env.sh
并在末尾添加path
export HIVE_HOME=/opt/module/hive
export HIVE_CONF_DIR=$HIVE_HOME/conf
export HIVE_AUX_JARS_PATH=$HIVE_HOME/lib
export HADOOP_HOME=/opt/module/hadoop-3.1.3
二、安装并配置mysql
这里我们采用MySQL数据库保存Hive的元数据,而不是采用Hive自带的derby来存储元数据。
1.mysql的安装请参考
Ubuntu安装MySQL
2.下载mysql jdbc 包
tar -zxvf mysql-connector-java-5.1.40.tar.gz   #解压
cp mysql-connector-java-5.1.40/mysql-connector-java-5.1.40-bin.jar  /usr/local/hive/lib #将mysql-connector-java-5.1.40-bin.jar拷贝到/usr/local/hive/lib目录下
3. 启动并登陆mysql shell
 service mysql start #启动mysql服务
 mysql -u root -p  #登陆shell界面
4. 新建hive数据库
mysql> create database hive; #这个hive数据库与hive-site.xml中localhost:3306/hive的hive对应,用来保存hive元数据5. 配置mysql允许hive接入
mysql> grant all on *.* to hive@localhost identified by 'hive';   #将所有数据库的所有表的所有权限赋给hive用户,后面的hive是配置hive-site.xml中配置的连接密码
mysql> flush privileges;  #刷新mysql系统权限关系表
6. 启动hive
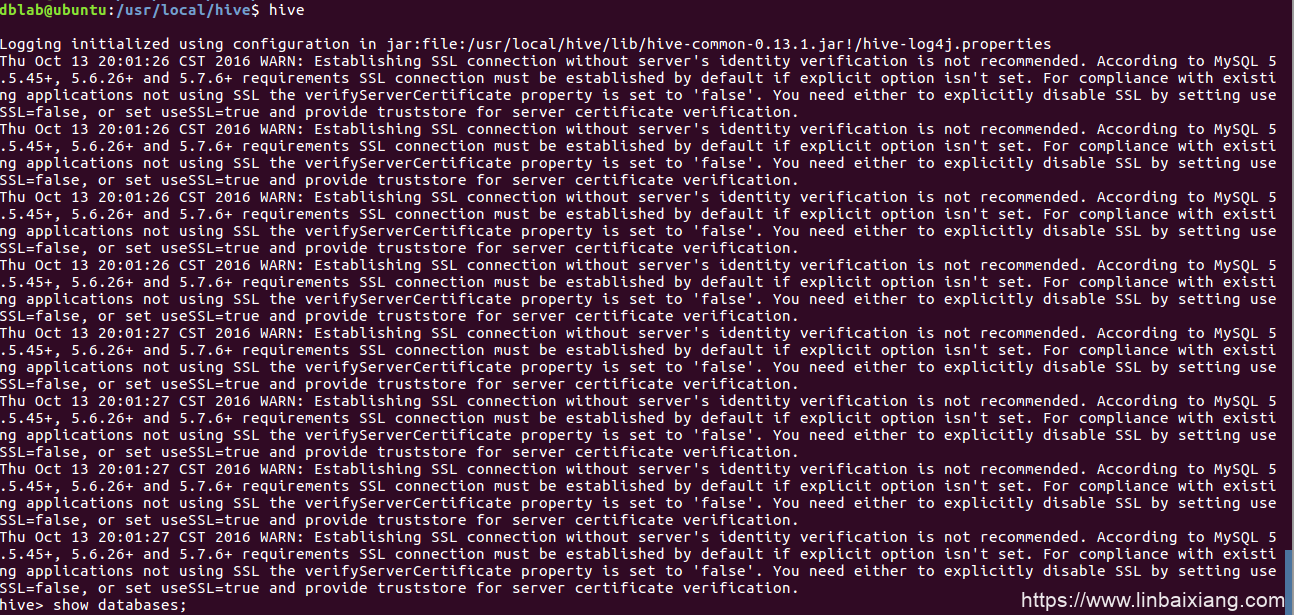
start-dfs.sh #启动Hadoop的HDFS
hive  #启动hive
注意,我们这里已经配置了PATH,所以,不要把start-all.sh和hive命令的路径加上。如果没有配置PATH,请加上路径才能运行命令,比如,本教程Hadoop安装目录是“/usr/local/hadoop”,Hive的安装目录是“/usr/local/hive”,因此,启动hadoop和hive,也可以使用下面带路径的方式:
cd /usr/local/hadoop #进入Hadoop安装目录
./sbin/start-dfs.sh
cd /usr/local/hive
./bin/hive
使用mysql作为元数据库时登陆
7. 安装过程可能遇到的问题
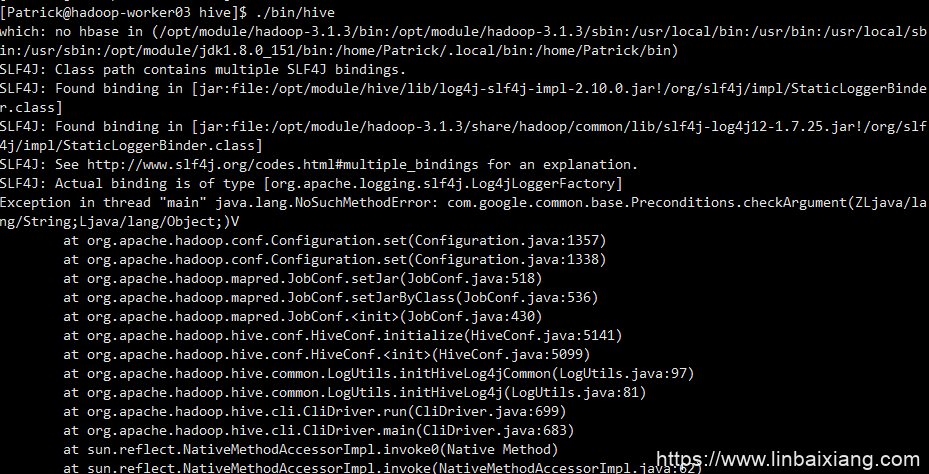
【错误1】
java.lang.NoSuchMethodError: com.google.common.base.Preconditions.checkArgument【原因】
com.google.common.base.Preconditions.checkArgument 这是因为hive内依赖的guava.jar和hadoop内的版本不一致造成的。
【解决方法】
1.查看hadoop安装目录下share/hadoop/common/lib内guava.jar版本
2.查看hive安装目录下lib内guava.jar的版本 如果两者不一致,删除版本低的,并拷贝高版本的 问题解决!
【错误2】
org.datanucleus.store.rdbms.exceptions.MissingTableException: Required table missing : “VERSION” in Catalog “” Schema “”. DataNucleus requires this table to perform its persistence operations.【解决方案】
进入hive安装目录(比如/usr/local/hive),执行如下命令:
./bin/schematool -dbType mysql -initSchema【错误3】
在启动Hive时,有可能会出现Hive metastore database is not initialized的错误,这里给出解决方案。
【解决方案】
解决Hive启动,Hive metastore database is not initialized的错误。出错原因:以前曾经安装了Hive或MySQL,重新安装Hive和MySQL以后,导致版本、配置不一致。解决方法是,使用schematool工具。Hive现在包含一个用于 Hive Metastore 架构操控的脱机工具,名为 schematool.此工具可用于初始化当前 Hive 版本的 Metastore 架构。此外,其还可处理从较旧版本到新版本的架构升级。所以,解决上述错误,你可以在终端执行如下命令:
cd /usr/local/hive
./bin/schematool -dbType mysql -initSchema
执行后,再启动Hive,应该就正常了。
【错误4】
【解决方案】
删掉hive的guava包,把hadoop的guava包scp过来,参考
https://blog.csdn.net/weixin_44625028/article/details/122313632
【错误5】
初始化Hive时报错failed to load driver
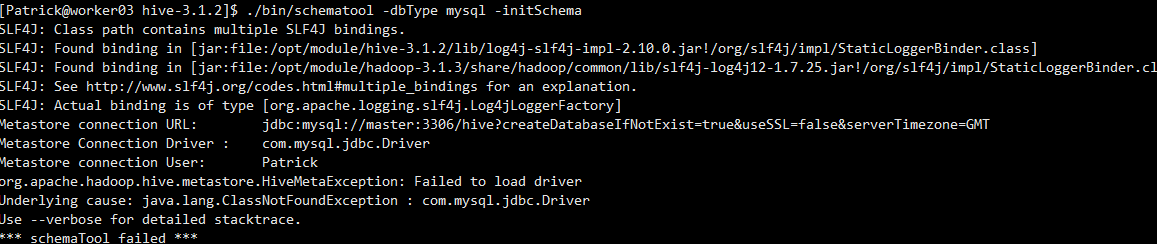
【解决方案】
下载一个mysql-connector-java的jar包,上传到hive安装目录下的lib即可。
初始化报错 access denied for user
三、Hive的常用HiveQL操作
1)Hive基本数据类型
首先,我们简单叙述一下HiveQL的基本数据类型。
Hive支持基本数据类型和复杂类型, 基本数据类型主要有数值类型(INT、FLOAT、DOUBLE ) 、布尔型和字符串, 复杂类型有三种:ARRAY、MAP 和 STRUCT。
a.基本数据类型
- TINYINT: 1个字节
- SMALLINT: 2个字节
- INT: 4个字节
- BIGINT: 8个字节
- BOOLEAN: TRUE/FALSE
- FLOAT: 4个字节,单精度浮点型
- DOUBLE: 8个字节,双精度浮点型STRING 字符串
b.复杂数据类型
- ARRAY: 有序字段
- MAP: 无序字段
- STRUCT: 一组命名的字段
2)常用的HiveQL操作命令
数据定义:主要用于创建修改和删除数据库、表、视图、函数和索引。
创建、修改和删除数据库
create database if not exists hive;       #创建数据库
show databases;                           #查看Hive中包含数据库
show databases like 'h.*';                #查看Hive中以h开头数据库
describe databases;                       #查看hive数据库位置等信息
alter database hive set dbproperties;     #为hive设置键值对属性
use hive;                                 #切换到hive数据库下
drop database if exists hive;             #删除不含表的数据库
drop database if exists hive cascade;     #删除数据库和它中的表
注意,除 dbproperties属性外,数据库的元数据信息都是不可更改的,包括数据库名和数据库所在的目录位置,没有办法删除或重置数据库属性。
创建、修改和删除表
#创建内部表(管理表)
create table if not exists hive.usr(
      name string comment 'username',
      pwd string comment 'password',
      address struct<street:string,city:string,state:string,zip:int>,
      comment  'home address',
      identify map<int,tinyint> comment 'number,sex')
      comment 'description of the table'
     tblproperties('creator'='me','time'='2016.1.1');
#创建外部表
create external table if not exists usr2(
      name string,
      pwd string,
  address struct<street:string,city:string,state:string,zip:int>,
      identify map<int,tinyint>)
      row format delimited fields terminated by ','
     location '/usr/local/hive/warehouse/hive.db/usr';
#创建分区表
create table if not exists usr3(
      name string,
      pwd string,
      address struct<street:string,city:string,state:string,zip:int>,
      identify map<int,tinyint>)
      partitioned by(city string,state string);
#复制usr表的表模式
create table if not exists hive.usr1 like hive.usr;

show tables in hive;
show tables 'u.*';        #查看hive中以u开头的表
describe hive.usr;        #查看usr表相关信息
alter table usr rename to custom;      #重命名表

#为表增加一个分区
alter table usr2 add if not exists
     partition(city=”beijing”,state=”China”)
     location '/usr/local/hive/warehouse/usr2/China/beijing';
#修改分区路径
alter table usr2 partition(city=”beijing”,state=”China”)
     set location '/usr/local/hive/warehouse/usr2/CH/beijing';
#删除分区
alter table usr2 drop if exists  partition(city=”beijing”,state=”China”)
#修改列信息
alter table usr change column pwd password string after address;

alter table usr add columns(hobby string);                  #增加列
alter table usr replace columns(uname string);              #删除替换列
alter table usr set tblproperties('creator'='liming');      #修改表属性
alter table usr2 partition(city=”beijing”,state=”China”)    #修改存储属性
set fileformat sequencefile;
use hive;                                                   #切换到hive数据库下
drop table if exists usr1;                                  #删除表
drop database if exists hive cascade;                       #删除数据库和它中的
视图和索引的创建、修改和删除
主要语法如下,用户可自行实现。
create view view_name as....;                #创建视图
alter view view_name set tblproperties(…);   #修改视图
因为视图是只读的,所以 对于视图只允许改变元数据中的 tblproperties属性。
#删除视图
drop view if exists view_name;
#创建索引
create index index_name on table table_name(partition_name/column_name)
as 'org.apache.hadoop.hive.ql.index.compact.CompactIndexHandler' with deferred rebuild....; 这里org.apache.hadoop.hive.ql.index.compact.CompactIndexHandler是一个索引处理器,即一个实现了索引接口的Java类,另外Hive还有其他的索引实现。
alter index index_name on table table_name partition(...) rebulid; #重建索引如果使用 deferred rebuild,那么新索引成空白状态,任何时候可以进行第一次索引创建或重建。
show formatted index on table_name;                       #显示索引
drop index if exists index_name on table table_name;      #删除索引
用户自定义函数
在新建用户自定义函数(UDF)方法前,先了解一下Hive自带的那些函数。show functions; 命令会显示Hive中所有的函数名称:

若想要查看具体函数使用方法可使用describe function 函数名:

首先编写自己的UDF前需要继承UDF类并实现evaluate()函数,或是继承GenericUDF类实现initialize()函数、evaluate()函数和getDisplayString()函数,还有其他的实现方法,感兴趣的用户可以自行学习。
另外,如果用户想在Hive中使用该UDF需要将我们编写的Java代码进行编译,然后将编译后的UDF二进制类文件(.class文件)打包成一个JAR文件,然后在Hive会话中将这个JAR文件加入到类路径下,在通过create function语句定义好使用这个Java类的函数。
add jar <jar文件的绝对路径>;                        #创建函数
create temporary function function_name;
drop temporary function if exists function_name;    #删除函数
3)数据操作
主要实现的是将数据装载到表中(或是从表中导出),并进行相应查询操作,对熟悉SQL语言的用户应该不会陌生。
向表中装载数据
这里我们以只有两个属性的简单表为例来介绍。首先创建表stu和course,stu有两个属性id与name,course有两个属性cid与sid。
create table if not exists hive.stu(id int,name string)
row format delimited fields terminated by '\t';
create table if not exists hive.course(cid int,sid int)
row format delimited fields terminated by '\t';
向表中装载数据有两种方法:从文件中导入和通过查询语句插入。
a.从文件中导入
假如这个表中的记录存储于文件stu.txt中,该文件的存储路径为/usr/local/hadoop/examples/stu.txt,内容如下。
stu.txt:
1 xiapi
2 xiaoxue
3 qingqing
下面我们把这个文件中的数据装载到表stu中,操作如下:
load data local inpath '/usr/local/hadoop/examples/stu.txt' overwrite into table stu;如果stu.txt文件存储在HDFS 上,则不需要 local 关键字。
b.通过查询语句插入
使用如下命令,创建stu1表,它和stu表属性相同,我们要把从stu表中查询得到的数据插入到stu1中:
create table stu1 as select id,name from stu;上面是创建表,并直接向新表插入数据;若表已经存在,向表中插入数据需执行以下命令:
insert overwrite table stu1 select id,name from stu where(条件);这里关键字overwrite的作用是替换掉表(或分区)中原有数据,换成into关键字,直接追加到原有内容后。
从表中导出数据
a.可以简单拷贝文件或文件夹
命令如下:
hadoop fs -cp source_path target_path;b.写入临时文件
命令如下:
insert overwrite local directory '/usr/local/hadoop/tmp/stu' select id,name from stu;查询操作
和SQL的查询完全一样,这里不再赘述。主要使用select…from…where…等语句,再结合关键字group by、having、like、rlike等操作。这里我们简单介绍一下SQL中没有的case…when…then…句式、join操作和子查询操作。
case…when…then…句式和if条件语句类似,用于处理单个列的查询结果,语句如下:
select id,name,
  case
  when id=1 then 'first'
  when id=2 then 'second'
  else 'third'
结果如下:

连接
连接(join)是将两个表中在共同数据项上相互匹配的那些行合并起来, HiveQL 的连接分为内连接、左向外连接、右向外连接、全外连接和半连接 5 种。
a. 内连接(等值连接)
内连接使用比较运算符根据每个表共有的列的值匹配两个表中的行。
首先,我们先把以下内容插入到course表中(自行完成)。
1 3
2 1
3 1
下面, 查询stu和course表中学号相同的所有行,命令如下:
select stu.*, course.* from stu join course on(stu .id=course .sid);执行结果如下:

b. 左连接
左连接的结果集包括“LEFT OUTER”子句中指定的左表的所有行, 而不仅仅是连接列所匹配的行。如果左表的某行在右表中没有匹配行, 则在相关联的结果集中右表的所有选择列均为空值,命令如下:
select stu.*, course.* from stu left outer join course on(stu .id=course .sid); 执行结果如下:

c. 右连接
右连接是左向外连接的反向连接,将返回右表的所有行。如果右表的某行在左表中没有匹配行,则将为左表返回空值。命令如下:
select stu.*, course.* from stu right outer join course on(stu .id=course .sid); 执行结果如下:

d. 全连接
全连接返回左表和右表中的所有行。当某行在另一表中没有匹配行时,则另一个表的选择列表包含空值。如果表之间有匹配行,则整个结果集包含基表的数据值。命令如下:
select stu.*, course.* from stu full outer join course on(stu .id=course .sid); 执行结果如下:

e. 半连接
半连接是 Hive 所特有的, Hive 不支持 in 操作,但是拥有替代的方案; left semi join, 称为半连接, 需要注意的是连接的表不能在查询的列中,只能出现在 on 子句中。命令如下:
select stu.* from stu left semi join course on(stu .id=course .sid); 执行结果如下:

子查询
标准 SQL 的子查询支持嵌套的 select 子句,HiveQL 对子查询的支持很有限,只能在from 引导的子句中出现子查询。
注意,在定义或是操作表时,不要忘记指定所需数据库。
四、Hive简单编程实践
下面我们以词频统计算法为例,来介绍怎么在具体应用中使用Hive。词频统计算法又是最能体现MapReduce思想的算法之一,这里我们可以对比它在MapReduce中的实现,来说明使用Hive后的优势。
MapReduce实现词频统计的代码可以通过下载Hadoop源码后,在 $HADOOP_HOME/share/hadoop/mapreduce/hadoop-mapreduce-examples-3.1.3.jar包中找到(wordcount类),wordcount类由63行Java代码编写而成。下面首先简单介绍一下怎么使用MapReduce中wordcount类来统计单词出现的次数,具体步骤如下:
1)创建input目录,output目录会自动生成。其中input为输入目录,output目录为输出目录。命令如下:
cd /usr/local/hadoop
mkdir input
2)然后,在input文件夹中创建两个测试文件file1.txt和file2.txt,命令如下:
cd  /usr/local/hadoop/input
echo "hello world" > file1.txt
echo "hello hadoop" > file2.txt
3)执行如下hadoop命令:
cd  ..
hadoop jar share/hadoop/mapreduce/hadoop-mapreduce-examples-3.1.3.jar wordcount input output
4)我们可以到output文件夹中查看结果,结果如下:
下面我们通过HiveQL实现词频统计功能,此时只要编写下面7行代码,而且不需要进行编译生成jar来执行。HiveQL实现命令如下:
create table docs(line string);
load data inpath 'file:///usr/local/hadoop/input' overwrite into table docs;
create table word_count as
select word, count(1) as count from
(select explode(split(line,' '))as word from docs) w
group by word
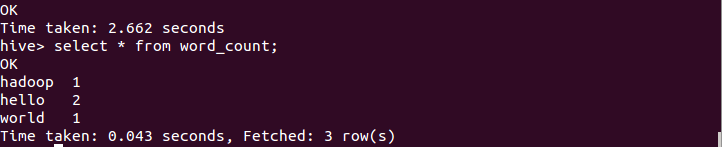
order by word;执行后,用select语句查看,结果如下:
由上可知,采用Hive实现最大的优势是,对于非程序员,不用学习编写Java MapReduce代码了,只需要用户学习使用HiveQL就可以了,而这对于有SQL基础的用户而言是非常容易的。
以上一至四的部分内容转载自文章 https://dblab.xmu.edu.cn/blog/2440/ ,侵则删。
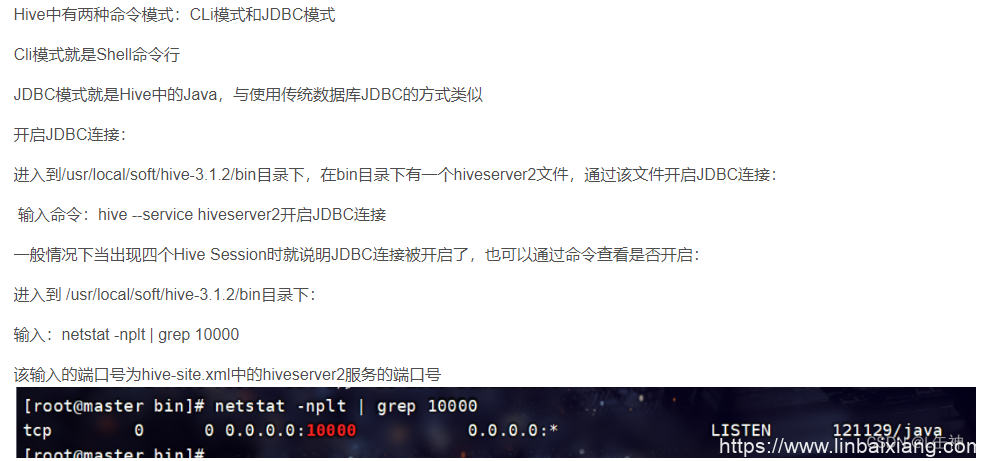
五、Dbeaver连接hive配置
1、启动hiveserver2
2、在DBeaver新建hive连接
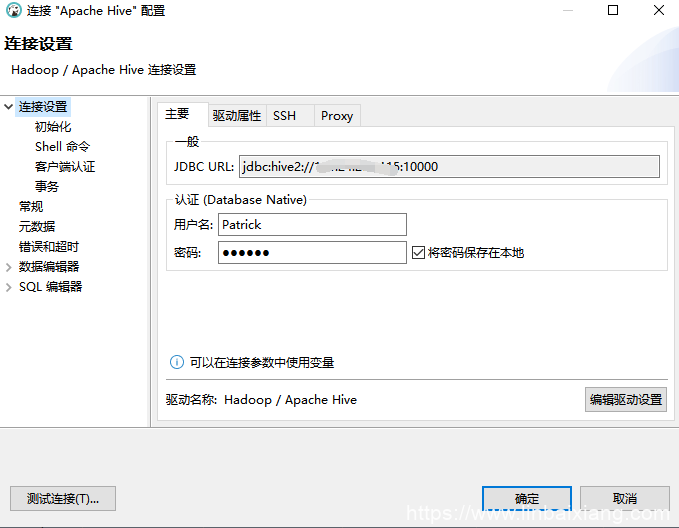
3、其他
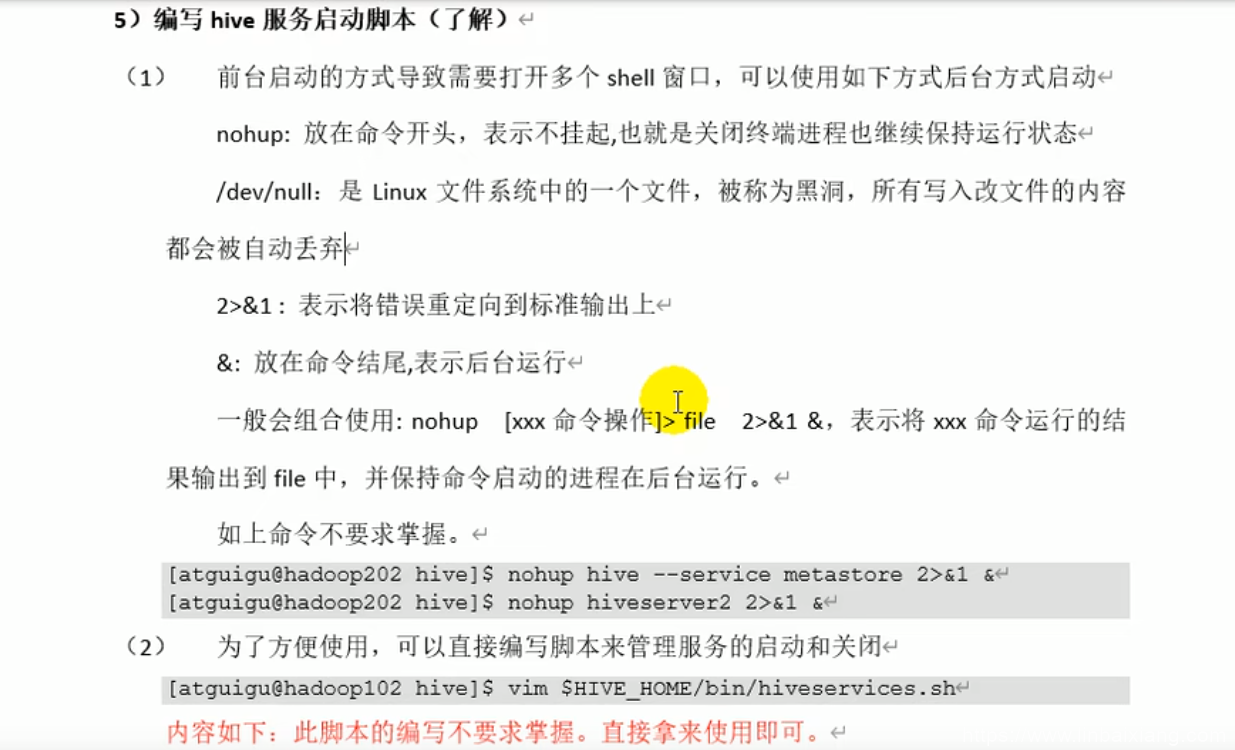
顺便一提,采用命令行启动的hiveserver2会一直挂着
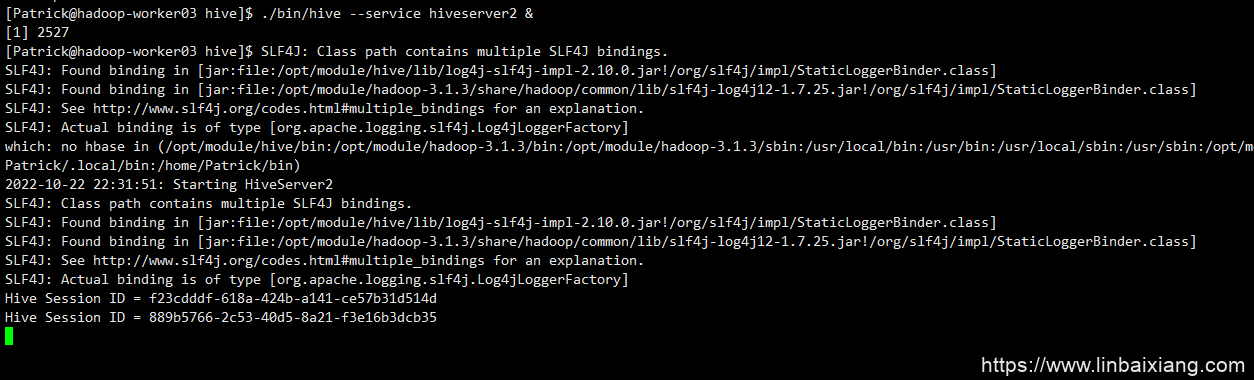
可以使用后台启动
附
本人自用的hive-site.xml
<?xml version="1.0" encoding="UTF-8" standalone="no"?>
<?xml-stylesheet type="text/xsl" href="configuration.xsl"?>
<configuration>
<!--判断mysql下是否有这个数据库,没有的话创建-->
<property>
<name>javax.jdo.option.ConnectionURL</name>
<value>jdbc:mysql://master:3306/hive?createDatabaseIfNotExist=true&useSSL=false&serverTimezone=GMT</value>
<description>JDBC connect string for a JDBC metastore</description>
</property>
<!--使用mysql driver驱动,默认是hive内置数据库derby驱动-->
<property>
<name>javax.jdo.option.ConnectionDriverName</name>
<value>com.mysql.jdbc.Driver</value>
<description>Driver class name for a JDBC metastore</description>
</property>
<!--mysql账号-->
<property>
<name>javax.jdo.option.ConnectionUserName</name>
<value>Patrick</value>
<description>username to use against metastore database</description>
</property>
<!--mysql密码-->
<property>
<name>javax.jdo.option.ConnectionPassword</name>
<value>000000</value>
<description>password to use against metastore database</description>
</property>
<!--显示查询出的数据的字段名称-->
<property>
  <name>hive.cli.print.header</name>
  <value>true</value>
  <description>Whether to print the names of the columns in query output.</description>
</property>
<!--在hive中显示当前所在数据库名称-->
<property>
  <name>hive.cli.print.current.db</name>
  <value>true</value>
  <description>Whether to include the current database in the Hive prompt.</description>
</property>
<!--使得查询单列数据不会执行mapreduce-->
<property>
  <name>hive.fetch.task.conversion</name>
  <value>more</value>
  <description>
    Some select queries can be converted to single FETCH task minimizing latency.
    Currently the query should be single sourced not having any subquery and should not have
    any aggregations or distincts (which incurs RS), lateral views and joins.
    1. minimal : SELECT STAR, FILTER on partition columns, LIMIT only
    2. more    : SELECT, FILTER, LIMIT only (TABLESAMPLE, virtual columns)
  </description>
</property>
<!-- hiveserver2的高可用参数,开启此参数可以提高hiveserver2的启动速度-->
<property>
    <name>hive.server2.active.passive.ha.enable</name>
    <value>true</value>
</property>

<property>
        <name>hive.server2.authentication</name>
        <value>NONE</value>
</property>
<property>
  <name>hive.server2.thrift.port</name>
  <value>10000</value>
  <description>Port number of HiveServer2 Thrift interface.
  Can be overridden by setting $HIVE_SERVER2_THRIFT_PORT</description>
</property>
<property>
  <name>hive.server2.thrift.bind.host</name>
  <value>worker03</value>
  <description>Bind host on which to run the HiveServer2 Thrift interface.
  Can be overridden by setting $HIVE_SERVER2_THRIFT_BIND_HOST</description>
</property>
<property>
  <name>hive.server2.long.polling.timeout</name>
  <value>5000</value>
  <description>Time in milliseconds that HiveServer2 will wait, before responding to asynchronous calls that use long polling</description>
</property>
<property>
        <name>hive.server2.thrift.client.user</name>
        <value>Patrick</value>
        <description>Username to use against thrift client</description>
</property>
<property>
        <name>hive.server2.thrift.client.password</name>
        <value>000000</value>
        <description>Password to use against thrift client</description>
</property>
</configuration>